|
Portrait Photography Lighting Diagrams
Portrait lighting diagrams are things novice portrait photographers love to see because the lighting illustrations tend to take some of the mystery out of the world of portrait lighting.
On this web site, you will see portrait lighting diagrams for the various lighting and light-to-subject relationships. Along with these lighting diagrams, you will find explanations about what each diagram is illustrating. Included in this article are portrait lighting diagrams for split portrait lighting, Rembrandt portrait lighting, long portrait lighting, short portrait lighting, and Butterfly Portrait lighting from two angles. I've also included a lighting diagram of my most-used location portrait lighting set-up.
|
|
My Location portrait lighting setup

|
Portrait Lighting Diagrams
for various portrait set-ups
We don't really talk about which lighting setup to use in any particular situation, but this will give you a starting point to illustrate the various weapons of portrait photography lighting. You'll have to learn how to use these weapons in another article, and a later date. For not, add another brick of knowledge to the portrait lighting information pile in your mind...
Portrait Lighting Diagram
Location Portrait Setup
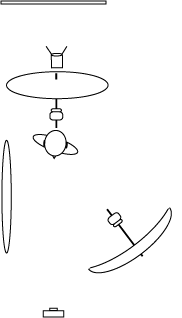
This is a portrait lighting diagram of my three-light location lighting setup. Unlike my other portrait lighting setups, I do not usually use an actual light for a fill light. In its place, I use a large flex fill reflector, and when in the studio, I may use a 4x8 piece of foam core for the fill light function.
If you haven’t figured out the portrait lighting diagram yet, the funny looking thing behind the subject’s head is an umbrella. Since the portrait lighting diagram is two-dimensional and my talents are not up to illustrating “height”, I need to tell you that the “Hair Light” is above and slightly behind the subject. With this lighting setup, I can easily and quickly get many posing and lighting variations. If you turn the subject’s body toward the light, you end up with short for Rembrandt lighting. If you turn the subject’s shoulders away from the main light, you end up with broad lighting.
There are two things you need to watch out for. 1, you should have the hair light on a separate power supply so that when you need to unplug the hair light for “lack of hair”, it doesn’t affect all the other lights in your setup. 2. Your mail light may need to be placed a little closer to the camera axis, depending on the shape of the subject’s face. If the subject has a protruding nose, it may cause an unattractive shadow across the face. A common mistake some new photographers make with their portrait lighting diagrams, is to place the hair light too far forward and by doing so, illuminate the nose. The hair light should not light the subject’s nose.
To learn more about my location portrait lighting setup here.
|
|
Portrait Lighting Diagram
Broad Portrait Lighting Setup
This portrait lighting diagram illustrates “Broad Portrait Lighting”. When a portrait photography subject points his nose slightly to one side of the camera, he causes one side of the face to appear broader and one side to appear narrower to the camera. Broad lighting is when the “broader” side of the subject’s face is lit by the main light. One thing you need to understand about portrait lighting, there is not real right or wrong. Photography is way to subject for that. When I was younger, I usually leaned toward Rembrandt lighting as my preferred portrait lighting. Lately, when I review the portraits from my locations shoots, where I usually shoot both Rembrandt and broad lighting, I usually end up favoring the broad lighting variation. And I’m not sure why…
BTW - Notice how my fill light is directly behind the camera. The is because a fill light should not cast its own shadow. Of course all light sources do cast a shadow, but by placing the fill light as close (and above) the camera axis as possible, you will end up with as little cast shadow as possible. To learn more about what a true fill light actually is, visit here.
|

|
|

|
Portrait Lighting Diagram
Short Portrait Lighting setup
A short lighting setup is just the opposite of broad lighting. Short lighting is when the subject turns his head and the light is on the narrower side of the face, while sill illuminating part of the broad side of the face. In other words, the shadow cast by the nose, is on the broad side of the face, closest to camera. See the portrait lighting diagram for the short portrait lighting setup.
Some people believe that this type of lighting tends to have a slimming effect on most subjects. As for me… I like to shoot both broad and short lighting and choose later. Ya, it’s called covering your butt. That’s what professionals do. They make sure that they have the picture.
|
|
Portrait Lighting Diagram
Rembrandt portrait lighting setup
Rembrandt portrait lighting is simply a variation of short lighting. When the lighting is such that the shadow of the nose reaches the shadow side of the face and forms a triangle on the short side of the face, it is referred to as Rembrandt lighting.
|
|
|
Portrait Lighting Diagram
Split Portrait Lighting Setup
So far, all the lighting setups have been dependent on which way the subject’s nose is pointing. With the remaining two portrait lighting diagram setups, this is not the case. Split lighting is when only one side of the subject’s face is illuminated by the main light, regardless when the nose is pointing. The main light does not spill onto the “shadow” side of the face. This lighting tends to be useful for ‘dramatic” portraiture. I seldom use it, but many others do quite successfully.
|
|
|
|
|
Portrait Lighting Diagram
Butterfly Portrait Lighting Setups
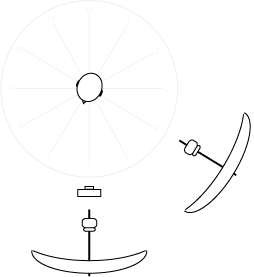
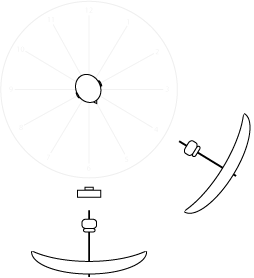
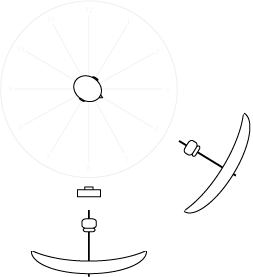
There are actually two portrait lighting diagrams here illustrating butterfly lighting. Butterfly lighting is when the main light casts a butterfly shaped shadow down from the nose. To achieve this effect, the light must be placed so that the subject’s nose is pointing in the direction of the main light. It isn’t important where the camera is in relation to this subject / main light relationship, it only matters where them subject is points his nose.
|
|
|
|
 |
So there you have it, portrait lighting diagrams showing how to create some really great portrait lighting setups. Remember that there is no right or wrong in portrait lighting, so experiment and see what happens. There will be times when one lighting setup works better than another. The there will be other times when the “other” lighting setup will be the better. In time, you’ll see a pattern and figure out for yourself which lighting diagram you need for a particular subject type. And then you’ll be in a rut! :+)
|
|
|
|
|
|
|
|
|
Michael Ray's photography and advertising links
|
|
|
|
|
|
|
|
|
|
|
|
|
|
|
|
|
|
|
|
|
|
|
|
|
|
|