|
||||||||
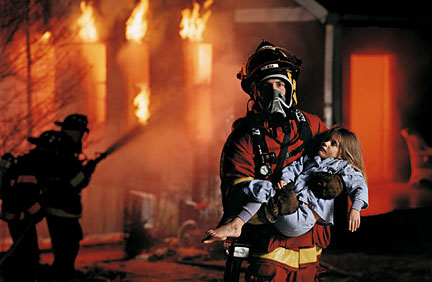
Photography lighting Techniques for location photographyThe study of this photograph will be a lesson in Industrial Photography and photography location lighting techniques. Novice professional and advanced amateur photographers now have a chance to learn from an experienced professional commercial photographer, the tricks, tactics, and photography lighting techniques of professional location photography. |
|
|||||||
 |
||||||||
|
||||||||
|
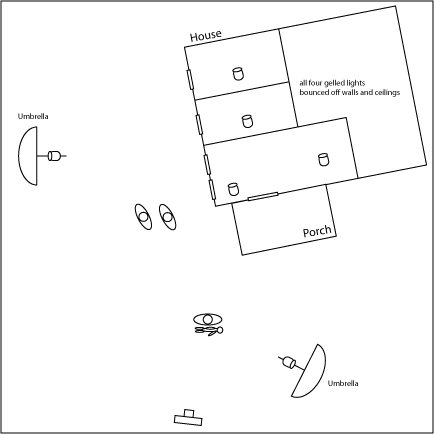
The photography lighting techniques set-up This location photography shoot was one of the most difficult but fun photography shoots that I have ever been on. I would imagine that it must be something akin to going to boot camp at Paris Island. (Ok, maybe my life is a little cushy). This shoot was a real bear, but it was very satisfying, once I got the film back. (Remember good old film?) We had to use some interesting photography lighting techniques to pull of the final image, but I was very pleased with the results. My client on the job was one of my all time favorite Art Directors, Alan Boarts, of A to Z Communications in Pittsburgh. I've beeh shooting with Alan for a long time and have always enjoyed working with him. The project was for Mine Safety Appliance, manufacture of Fireman's safety equipment, among other things. We were assigned to create several photographs for an ad campaign and also to create other supporting photography for various print materials. The photo above was the double page spread ad to run in several trade publications. We did the photography shoot in the middle of a very cold January. MSA had connections with various fire departments in the area and Alan and I were sent to scout a couple of different locations and finally decided on a property owned by St. Vincent's College, of Latrobe PA. The College actually had its own student-manned, campus fire department. The house we ended up using in the shoot was an unoccupied house that the campus fire department used for training. To train, they would fill the house with smoke and have practice navigating under adverse conditions. The house we chose was almost a perfect match to the layout. A very good start. Photography Lighting techniques special effectsOur first big obstacle was to get someone to handle the pyrotechnics. Shui and Rob Zeigler are a wife and husband stylist team that I work with quite a bit and they told me that they had a friend in NY that could handle this kind of job. Arrangements were made, the ducks were set in a row, and the shoot was scheduled. The big challenge for the pyro guy was to simulate the fire without actually burning down the house. Details, details... Here is how it was done. Rob and Tom custom made devices (pipes with holes drilled in them) that they suspended jsut outside the windows of the house. The tops of the windows were covered with fire retatrdant materials and treated with chemicals that helped with the same purpose. The pipes were connected to propane tanks. Of coarse, before any of this happened, we set up the camera (days before the actual shoot) to see which windows the flames need to come out of. The orange color emanating from the inside of the house was created by orange gells over the flash equipment strung throughout the house and powered by several gas generators. The temperature was in the teens and the poor little girl was a real trooper through the whole ordeal. How would you like to be stuck out in the cold for hours in your PJs? (We had a camper for her, her parents, and clients to hang out in.) Photography lighting techniques for location shootsPhotographically, these were the challenges: 1. Match the layout as closely as possible. We really lucked out there. The house fit the on in the layout very closely. That was easy. We brought in all the props on the porch and made the house to look as lived in as possible 2. Probably the biggest pain in the butt with the whole shoot, was dealing with the temperature. You can't really tell too much from the photo, but there was about six inches of snow on the ground, and it was bitter cold. Like most professionals, I had become dependent on Polaroids, not only for checking composition and lighting, but also for exposure. The big problem was that Polaroid development time was dependant on temperature and nineteen degrees wasn’t even on the development chart. I actually had to trust my meter, something I hadn't ever been comfortable with. So keeping the Polaroid warm enough to develop and then making the stretch to "believe" that the information that the Polaroids were giving me was accurate, was the real issue of the shoot. As you can see, things worked out. 3. On of the other problems that we encountered was getting all the strobes inside the house to go off using optical slaves. The light from the fire made the slave unites less sensitive to the flash of the other strobes. We ended up running extension PC cords to areas where the slaves could more easily see the other flashed going off. 4. Imitating the color of fire with gelled flash heads took some experimentation too. 5. Coordination of everything got to be a real pain. Most of the crew had walkie-talkies, but still there were just too many elements to make this an easy shoot. It was more of a movie shoot set than a still photography set. We had to coordinate the models and clients warming themselves in the trailer, the guys working the propane tanks, the guy working the smoke machine inside the house, the fireman models, the guys manning the fire truck water supply, the clients making sure that the models equipment looked just right, the photo assistant manage the camera, and all the fireman and client types just milling around. The place was a zoo. |
||||||||
 |
||||||||
Photography lighting techniques - The drama of fireFrom a photogrpahy lighting standpoint, the shooting wasn't too difficult. The challenge was to make the shot dramatic. Fire and drama go pretty easily together, so that wasn't too much of a problem. The key was to "edge light" things, giving the viewer just enough information to identify what was going on and yet still keep things looking like it was still dark out. I think that a mistake of a less experienced photographer would have been to "over light? the models and houses. Sometimes less is better. Photographing fire - Since the shot was taken at night and the aperture was determined by the fact that I wanted very little depth of field, the intensity of the fire was tweaked by varying the shutter speed. If we left the shutter open too long, the color of the fire would have became a little too washed out and if the shutter was not open long enough, the maximum "size" of the flame would not have been attained. Since there was only the flash lighting the subject, even longer-than-normal shutter speeds would not be a problem with regards to "subject movement". The flash would freeze the subject and if there was a little ghosting caused by any subject movement (while the shutter was open), the ghosting would have been on the very edge of the models (where they overlapped the fire) and probably would have been a welcome effect adding to the drama of the shot. |
||||||||
|
|
||||||||
|
© Michael Ray 2008 |
Return to Professional Photography 101 | |||||||